


Table of Contents
- What Is Limewash Paint?
- Why Montreal Homeowners Choose Limewash
- Tools and Materials You'll Need
- Step 1: Prep Your Surface
- Step 2: Mix Your Limewash
- Step 3: Apply the First Coat
- Step 4: Apply the Second Coat
- Step 5: Final Touches and Curing
- Common Mistakes to Avoid
- Maintenance Tips for Your Limewash Walls
- FAQs
- Conclusion
Limewash paint turns plain walls into stunning focal points with texture and natural beauty that regular paint can't match. This ancient technique has gained popularity in Montreal homes as an eco-friendly alternative that creates depth and character impossible to achieve with standard finishes.
Renovating a heritage home in Old Montreal or updating a modern condo in Laval? Limewash delivers that coveted European aesthetic while handling our city's challenging climate conditions.
This guide covers the complete limewash application process, from surface prep to final curing, so you can get professional results at home.
What Is Limewash Paint?
Limewash starts with limestone that's been burned and mixed with water. Unlike regular paint that sits on the surface, limewash soaks into porous materials and bonds with them, creating a finish that gets stronger as it ages.
The lime putty in limewash undergoes carbonation while curing, which forms a crystalline structure that naturally fights bacteria and allows walls to breathe. This means your walls can manage moisture while staying resistant to mold and bacteria.
The finish has a soft, matte appearance with gentle color shifts that change as light moves across the surface throughout the day. This creates an organic, living quality that you simply can't get with synthetic paints.
Why Montreal Homeowners Choose Limewash
Montreal's wild seasonal swings make limewash perfect for interior walls. Its breathable quality helps balance humidity as we shift from steamy summers to bone-dry winter heating.
Older homes in Plateau-Mont-Royal and Westmount work especially well with limewash since it pairs naturally with heritage building materials while letting walls breathe. Many homeowners love the effortless European elegance it brings—that soft, lived-in texture you see in design magazines. Beyond looks, limewash fights bacteria naturally and won't release harmful chemicals into your air, which matters for families focused on healthy indoor environments.
Tools and Materials You'll Need
Gather these essential supplies before starting your limewash project:
Brushes and Application Tools:
- Natural bristle brush (4-6 inches wide)
- Large mixing paddle or drill with mixing attachment
- Drop cloths and plastic sheeting
Preparation Materials:
- High-quality matte primer (mandatory for bare surfaces)
- Sandpaper (220-grit)
- TSP cleaner or mild detergent
- Painter's tape
- Clean rags and sponges
Safety Equipment:
- Safety glasses
- Dust mask
- Rubber gloves
- Ventilation fan if working in enclosed spaces
Limewash Paint:
Quality matters significantly with limewash. Professional-grade products like San Marco limewash offer superior coverage and durability compared to budget alternatives.
Step 1: Prep Your Surface
Proper surface preparation determines your project's success. Limewash needs a clean, stable surface to bond effectively.
Clean the Surface:
Remove all dirt, grease, and loose debris using TSP cleaner or mild detergent. Pay attention to areas around light switches and door frames where oils from hands build up.
Sand if Necessary:
Glossy or semi-gloss surfaces need light sanding with 220-grit paper so the limewash can grab properly. Clean off all dust afterward with a damp cloth.
Prime All Bare Surfaces:
This is where most DIY projects fail—limewash simply won't bond to raw drywall, fresh plaster, concrete, or brick without primer. These surfaces will absorb the limewash unevenly, leaving you with a blotchy mess.
Get a high-quality matte primer and coat any unpainted spots thoroughly. Let it cure completely before moving forward—rushing this step ruins everything that comes after.
Do You Need Primer?
Primer is always required on new or bare surfaces including gypsum, plaster, concrete, and brick. Skip it only on previously painted matte walls in good condition with no peeling, chalking, or bare spots showing through. However, we will alway suggest adding San Marco primer suchas Atomo or Decorfond to ensure proper results.
Protect Adjacent Surfaces:
Use painter's tape and plastic sheeting to protect floors, trim, and fixtures. Limewash can be tough to remove once it dries.
Step 2: Mix Your Limewash
Getting the consistency right makes all the difference in how your limewash applies and looks.
Initial Mixing:
Stir thoroughly with a mixing paddle or drill attachment until you get a creamy texture like heavy cream. We suggest diluting your first coat with 20-25% water, and second coat at 15%.
Strain if Needed:
Found some lumps? Strain through cheesecloth or fine mesh until smooth.
Test Your Color:
Try a small patch in an inconspicuous spot first—behind a door works well. Wet limewash appears much darker than the dried result, so that intense-looking test area will lighten considerably.
Mix Only What You Need:
Limewash thickens once stirred, so prepare just enough for a few hours of work rather than the entire project.
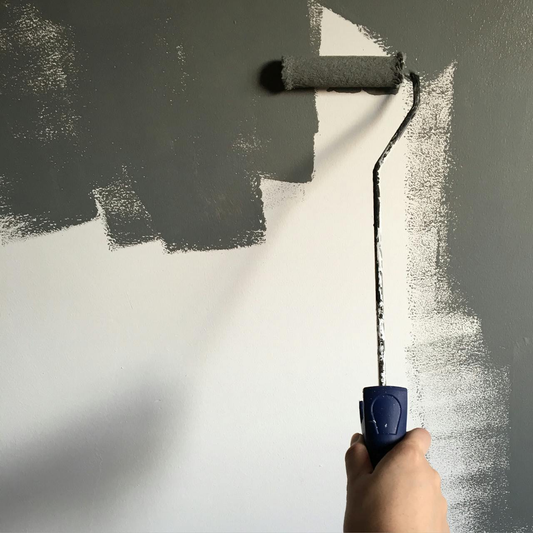
Step 3: Apply the First Coat
Getting this base layer right sets up everything that follows.
Load Your Brush:
Dip about one-third of the bristles into your limewash. Loading too much creates drips and makes the brush unwieldy.
Application Technique:
Skip the neat, parallel strokes you'd use with regular paint—limewash looks best with random, crisscrossing motions. This builds texture and avoids obvious brush marks.
Work in manageable 3x3 foot sections so you can blend edges while everything's still wet. Once limewash starts setting up, you've lost your window for blending.
Don't Worry About Perfection:
Your first coat will look uneven and patchy—that's completely normal. Limewash develops its character through multiple layers, not from trying to achieve perfect coverage in one pass.
Step 4: Apply the Second Coat
This coat starts revealing what makes limewash special.
Wait for Proper Cure:
Give that first coat 6-12 hours to dry completely. Touch test—no cool spots that signal hidden moisture.
Keep It Thin:
This coat should be lighter than your first—you're building translucent depth, not trying to hide everything underneath in one heavy pass.
Work Those Edges:
Move quickly to blend section boundaries while the limewash stays workable. Feather strokes help eliminate obvious lines where your work areas meet.
Step 5: Final Touches and Curing
How you handle these final steps separates amateur work from professional results.
Check Your Coverage:
Step back after the second coat dries. You'll typically need 2 coats to get the right coverage and depth.
Pull Tape While Damp:
Get that painter's tape off before the final coat hardens completely. This stops the limewash from peeling away with the adhesive. Wipe up any drips immediately with a damp cloth.
Let It Cure Properly:
The carbonation process keeps strengthening your walls for weeks. Stay away from scrubbing or washing for at least a month. Add any of San Marco sealers if you are looking for a more washable surface.
Watch the Environment:
Moderate humidity helps the curing process—too much moisture slows things down, while bone-dry conditions can leave you with chalky surfaces.
Common Mistakes to Avoid
These slip-ups can wreck your limewash project, but they're simple to sidestep.
Skipping Surface Preparation:
Poor cleaning or skipping primer on bare surfaces leads to adhesion problems and early failure. Don't cut corners on prep work—especially primer on any unpainted areas.
Applying Too Thick:
Heavy application doesn't improve coverage and often creates an artificial, painted look rather than limewash's natural beauty. Build coverage gradually with thin coats.
Working in Direct Sunlight:
Hot, direct sun dries limewash too fast, making blending impossible and leaving obvious lap marks. Choose shaded areas or cooler times of day.
Using Synthetic Brushes:
Synthetic bristles can't hold limewash properly and leave streaky results. Natural bristles are essential for good texture and coverage.
Rushing the Process:
Limewash won't be rushed. Hurrying between coats or trying to speed through the job always shows in your final results.
Maintenance Tips for Your Limewash Walls
Taking care of your limewash walls properly keeps them looking great for years.
Regular Dusting:
A soft brush or microfiber cloth takes care of everyday dust without any problems. Stay away from wet cleaning during that first month while the curing wraps up.
Gentle Cleaning:
Once fully cured, a barely damp cloth with just a drop of mild soap handles most cleaning situations. Harsh cleaners and scrubbing damage the surface permanently.
Touch-Up Strategy:
Small damages can be touched up by misting the area and applying limewash with a small brush. Blend carefully into surrounding areas.
Annual Inspection:
Check for any areas showing wear or damage, particularly in high-traffic areas. Early intervention prevents larger problems.
For professional-grade limewash and application tools, visit decormondo.com where you'll find San Marco limewash products and everything needed for your project.
FAQs
How long does limewash take to fully cure?
Limewash reaches initial cure in 24-48 hours but continues carbonating and strengthening for 2-4 weeks. Full durability develops over this extended curing period.
Can I apply limewash over existing paint?
Yes, limewash adheres well to matte and eggshell paint finishes, however we will always suggest Atomo or Decorfond base coat to ensure proper results. Glossy or semi-gloss surfaces need light sanding first. Always prime any bare areas that show through existing paint.
What's the coverage rate for limewash?
Expect 400-500 square feet per gallon for the first coat, with subsequent coats covering slightly more due to reduced absorption. Coverage varies based on surface porosity.
How do I fix streaks or lap marks?
While the limewash is still workable, lightly mist the problem area and blend with gentle brush strokes. Once cured, you'll need to apply another thin coat to correct issues.
Is limewash suitable for Montreal's climate?
Absolutely. Limewash's breathable nature handles humidity changes well, making it ideal for Montreal's seasonal variations. It's particularly good for older homes that need moisture management.
What colors are available in limewash?
Limewash starts as white or cream but accepts compatible pigments for tinting. Popular options include warm whites, soft grays, and earth tones that work well with Montreal's architectural character. At Décor Mondo we can tint almost any paint colour.
Can I use limewash in bathrooms?
Limewash resists bacteria naturally, but avoid shower areas or spots with direct water exposure. It works great in powder rooms and well-ventilated bathroom spaces. We suggest adding 2 coats of San Marco 4 Protection to make the surface more washable.
Conclusion
Applying limewash paint creates stunning, natural-looking walls that improve with age and add authentic character to your home. Success comes from proper surface preparation—including mandatory priming of all bare surfaces—and patient application of thin, well-blended coats.
Take your time with each step, from thorough cleaning to final curing, and you'll achieve the sophisticated European aesthetic that makes limewash so desirable. The investment in quality materials and careful technique pays off with walls that become more beautiful over time.
Ready to start your limewash project? Shop professional-grade San Marco limewash paint at Décor Mondo — available online at decormondo.com/collections/limewash or visit us in-store at 2002 boulevard des Laurentides, Laval.


